> ## Documentation Index
> Fetch the complete documentation index at: https://docs.pipecat.ai/llms.txt
> Use this file to discover all available pages before exploring further.
# Overview of Pipecat
> Learn the foundational concepts of Pipecat's architecture for building voice AI agents
## What You'll Learn
This comprehensive guide will teach you how to build real-time voice AI agents with Pipecat. By the end, you'll be equipped with the knowledge to create custom applications—from simple voice assistants to complex multimodal bots that can see, hear, and speak.
**Prerequisites**: Basic Python knowledge is recommended. The guide takes
approximately 45-60 minutes to complete, with hands-on examples throughout.
## Why Voice AI is Challenging
Building responsive voice AI applications involves coordinating multiple AI services in real-time:
* **Speech recognition** must transcribe audio as users speak
* **Language models** need to process context and generate responses
* **Speech synthesis** has to convert text back to natural audio
* **Network transports** must handle streaming audio with minimal delay
Doing this manually means managing complex timing, buffering, error handling, and service coordination. Most developers end up rebuilding the same orchestration logic repeatedly.
## Pipecat's Solution
Pipecat solves this orchestration problem with a **pipeline architecture** that handles the complexity for you. Instead of managing individual API calls and timing, you define a flow of processing steps that work together automatically.
Here's what makes Pipecat different:
Typical voice interactions complete in 500-800ms for natural conversations
Swap AI providers, add features, or customize behavior without rewriting
code
Stream processing eliminates waiting for complete responses at each step
Built-in error handling, logging, and scaling considerations
## Core Architecture Concepts
Before diving into how voice AI works, let's understand Pipecat's four foundational concepts:
### Frames
Think of frames as **data packages** moving through your application. Each frame contains a specific type of information:
* Audio data from a microphone
* Transcribed text from speech recognition
* Generated responses from an LLM
* Synthesized audio for playback
### Frame Processors
Frame processors are **specialized building blocks** that handle specific tasks:
* A speech-to-text processor converts audio frames into text frames
* An LLM processor takes text frames and produces response frames
* A text-to-speech processor converts response frames into audio frames
### Pipelines
Pipelines **connect processors together**, creating a path for frames to flow through your application. They handle the orchestration automatically.
### Workers
A **worker** runs a pipeline. A worker that owns a pipeline is an **agent** in your application -- a standalone voice bot is a single worker (a `PipelineWorker`). Pipecat is a multi-agent system, so you can run several workers that coordinate over a shared bus. The `WorkerRunner` starts your workers and manages their lifecycle.
## Voice AI Processing Flow
Now let's see how these concepts work together in a typical voice AI interaction:
User speaks → Transport receives streaming audio → Creates audio frames
STT processor receives audio frames → Transcribes speech in real-time →
Outputs text frames
Context processor aggregates text frames with conversation history → Creates
formatted input for LLM
LLM processor receives context → Generates streaming response → Outputs text
frames
TTS processor receives text frames → Converts to speech → Outputs audio
frames
Transport receives audio frames → Streams to user's device → User hears
response
The key insight: **everything happens in parallel**. While the LLM is generating later parts of a response, earlier parts are already being converted to speech and played back to the user.
## Pipeline Architecture
Here's how this flow translates into a Pipecat pipeline:
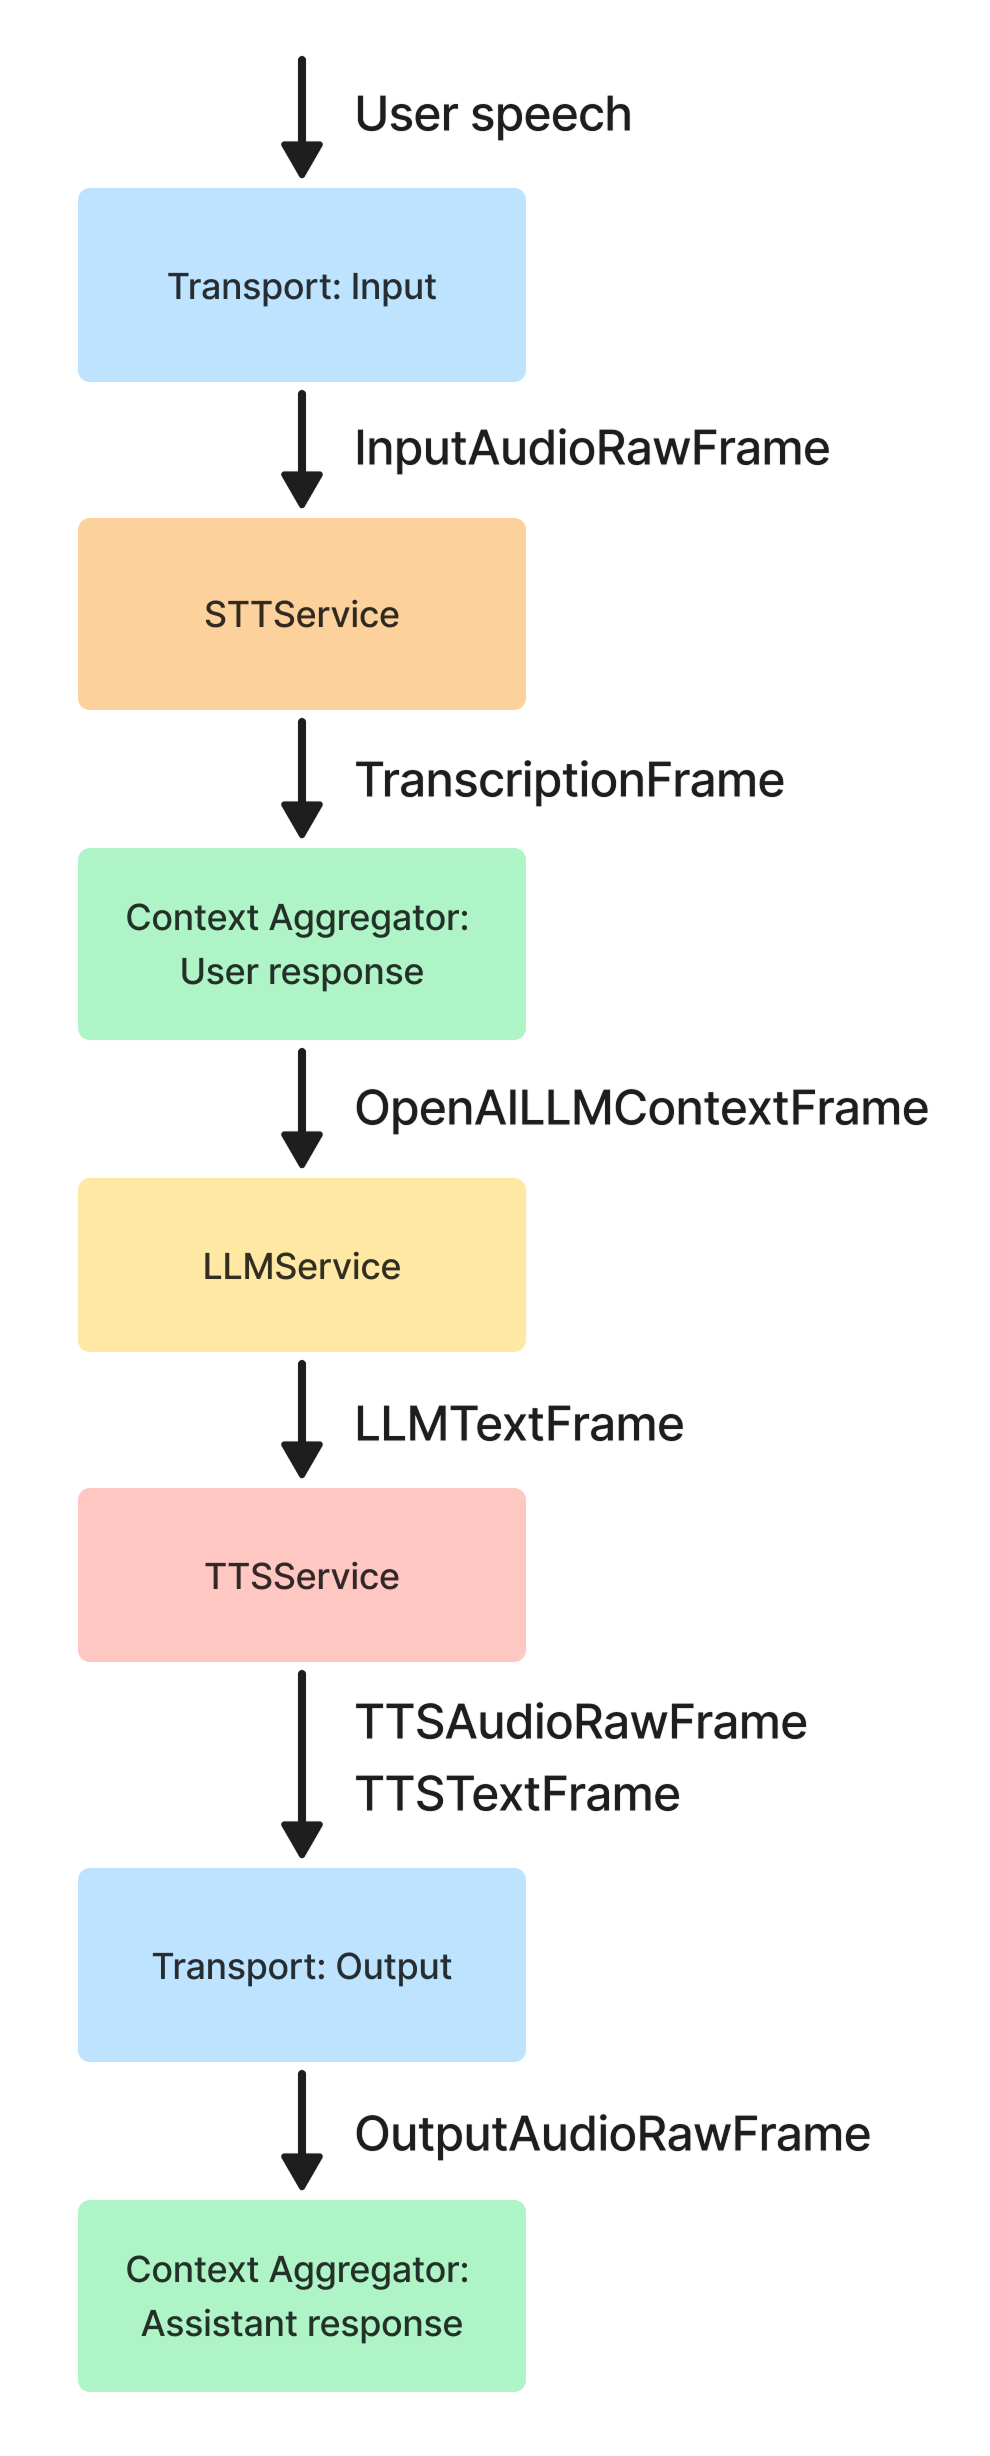 Each processor in the pipeline:
1. Receives specific frame types as input
2. Performs its specialized task (transcription, language processing, etc.)
3. Outputs new frames for the next processor
4. Passes through frames it doesn't handle
While frames can flow upstream or downstream, most data flows downstream as
shown above. We'll discuss pushing frames in later sections.
## What's Next
In the following sections, we'll build a complete agent and explore each component in detail:
* Building and running your first agent
* How to initialize sessions and connect users
* Configuring different transport options (Daily, WebRTC, Twilio, etc.)
* Setting up speech recognition and synthesis services
* Managing conversation context and LLM integration
* Handling the complete pipeline lifecycle
* Coordinating multiple agents that share a message bus
Each section includes practical examples and configuration options to help you build production-ready voice AI applications.
Let's build and run your first agent
Each processor in the pipeline:
1. Receives specific frame types as input
2. Performs its specialized task (transcription, language processing, etc.)
3. Outputs new frames for the next processor
4. Passes through frames it doesn't handle
While frames can flow upstream or downstream, most data flows downstream as
shown above. We'll discuss pushing frames in later sections.
## What's Next
In the following sections, we'll build a complete agent and explore each component in detail:
* Building and running your first agent
* How to initialize sessions and connect users
* Configuring different transport options (Daily, WebRTC, Twilio, etc.)
* Setting up speech recognition and synthesis services
* Managing conversation context and LLM integration
* Handling the complete pipeline lifecycle
* Coordinating multiple agents that share a message bus
Each section includes practical examples and configuration options to help you build production-ready voice AI applications.
Let's build and run your first agent