

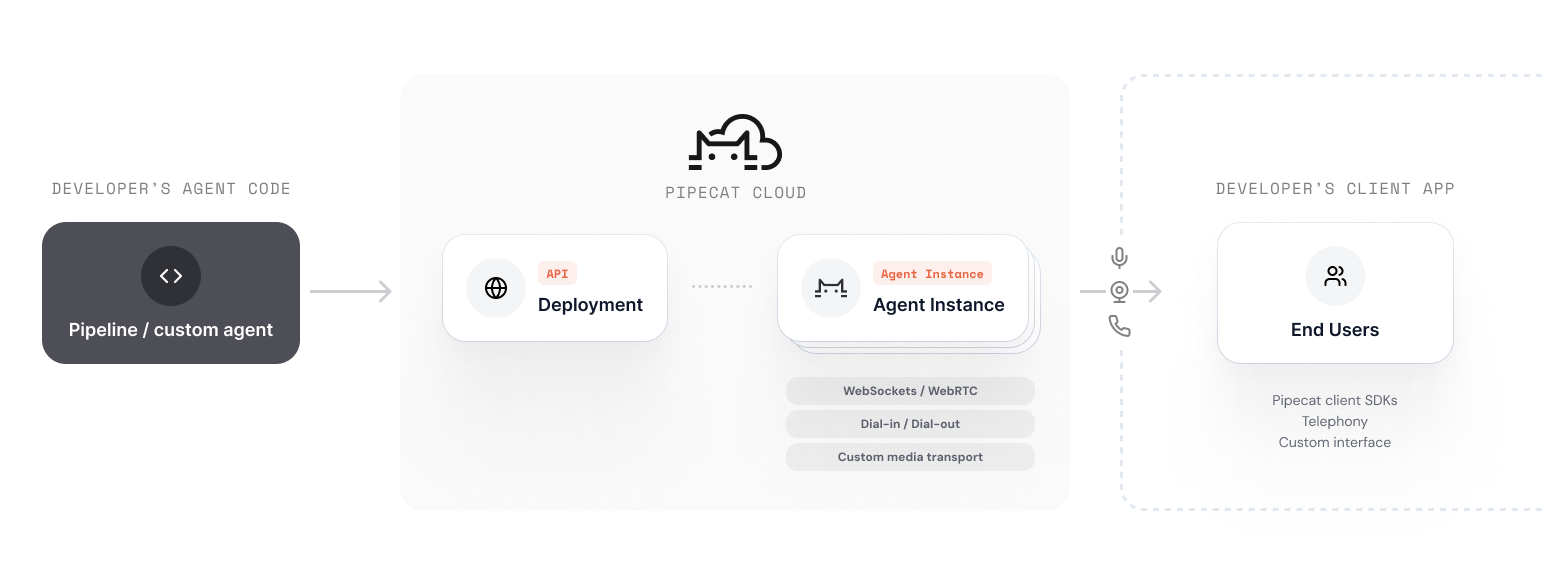
Two ways to run
Pipecat Cloud
Multi-tenant and fully managed. Your agents run in Daily-hosted regions
and Daily operates everything. Sign up and deploy in minutes.
Pipecat Enterprise
Single-tenant and hybrid. Your agents run in a self-hosted region — a
Kubernetes cluster in your VPC.
The Pipecat Enterprise overview has the
full comparison, and Architecture
explains how the control plane and data plane divide the work.
Start on Cloud, grow into Enterprise
Pipecat Cloud and Pipecat Enterprise are one platform. Start on Cloud and move agents to a self-hosted region when data residency, network placement, or scale calls for it. Your image, deploy workflow, and session code carry over unchanged, and you can run agents in both. What stays the same:- Agent images: The same image format, pulled from any container registry. See Agent Images.
- Deploys:
pipecat cloud deploy, the dashboard, orpcc-deploy.toml, with a region chosen per agent. See Deployments. - Sessions: The same REST API and Python SDK on any transport — Daily WebRTC, WebSocket, or telephony.
- Scaling:
min_agentsandmax_agents, scaling from zero with session demand. See Scaling. - Secrets: Agents reference secret sets by name. In a self-hosted region, the values live in your cluster. See Secrets.
- Observability: Sessions, per-session CPU and memory metrics, and agent logs in the dashboard, CLI, and API. In a self-hosted region, logs are stored in your own log store, which is optional.
How it works
1
Build your agent
Write a Pipecat pipeline as you normally would, using any supported services.
2
Install the CLI
Install the Pipecat CLI with the Pipecat Cloud plugin:
3
Deploy
Build and deploy your agent image to a region — Daily-hosted or your own.
4
Start sessions
Use the REST API or Python SDK to start agent sessions on demand.
Pricing
Pipecat Cloud uses usage-based pricing. See the pricing page for current rates and a calculator to estimate your total cost per minute, including third-party AI services. Pipecat Enterprise is billed under your enterprise agreement; agent-minutes in self-hosted regions are not metered by agent profile. Contact sales for details.Next steps
Create your account
Get your account set up and ready to deploy your first agent.
Deploy your first agent
Deploy the quickstart agent to Pipecat Cloud.
Pipecat Enterprise
What you operate in a self-hosted region, and how to get started.